Introduction
This whitepaper demonstrates the use of SQL Anywhere and Visual Studio 2010
to build a database-driven ASP.NET web site. The web application is a simple
company directory that displays general employee information in a public page,
as well as detailed information in a password-protected secure page. The data in
the secure page can only be viewed after a user logs in with the correct
credentials. The use of SQL Anywhere ASP.NET providers is highlighted to
implement the security mechanism. Topics include information about how to
install, configure and set up the SQL Anywhere ASP.NET providers as well as how
SQL Anywhere stores application security details in the database. The tutorial
also describes how to bind EntityDataSource objects to data-bound server
controls and how to integrate the new Dynamic Data feature of the .NET Framework
4.0 in the example web site.
|
Required Software
- SQL Anywhere
- Microsoft Visual Studio 2010 with .NET Framework 4.0
- Source code for C# and Visual Basic projects
Overview
This tutorial covers the following areas:
- Installing the SQL Anywhere ASP.NET providers.
- Connecting to the demo database and viewing the SQL Anywhere ASP.NET
providers' schema using Sybase Central.
- Creating an ASP.NET web site. In this section, we create the web site and
add an Entity Data Model (EDM) to the web site from a SQL Anywhere database.
- Creating a GridView web control and bind it to an EntityDataSource object.
The GridView control gets its data from the EDM and displays the data on the
public page.
- Configuring the SQL Anywhere ASP.NET providers. This section illustrates how
to register the providers in the web.config file and how to use the ASP.NET
Administration Tool.
- Creating a members-only page. The information on this page will be
accessible only to authenticated users.
- Formatting the display of data using the Dynamic Data feature provided by
ASP.NET 4.0.
Installing the SQL Anywhere ASP.NET Providers
The SQL Anywhere ASP.NET providers allow you to build a security mechanism
using a SQL Anywhere database as backend storage. They must be installed in
order to add the required schema to a designated database for storing and
managing confidential user information. SQL Anywhere includes five
providers:
- Membership Provider: provides authentication and
authorization services.
- Roles Provider: provides methods for creating roles, adding
users to roles, and deleting roles. Use the roles provider to assign users to
groups and manage permissions.
- Profiles Provider: provides methods for reading, storing,
and retrieving user information such as user preferences.
- Web Parts Personalization Provider: provides methods for
loading and storing the personalized content and layout of web pages.
- Health Monitoring Provider: provides methods for monitoring
the status of deployed web applications.
Please refer to the online documentation for more information about SQL Anywhere ASP.NET Providers.
SQL Anywhere also provides a setup wizard to help you add the required
security schema to the database. You can either add the SQL Anywhere ASP.NET
providers to a new database or to an existing database. For simplicity, we will
use the SQL Anywhere demo database in the following procedures.
Steps
- Using Windows Explorer, browse to the installation folder where SQL Anywhere
is installed (the default installation path is shown here) and locate the
following folder:
C:\Program Files\SQL Anywhere
12\Assembly\v2
- Double-click SASetupAspNet.exe to run the ASP.NET Security
Schema Setup Wizard. Alternatively, you can run SASetupAspNet.exe from a command
line prompt. When using the command line to access the SASetupAspNet.exe, use
the question mark (-?) argument to display detailed help for configuring the
database.
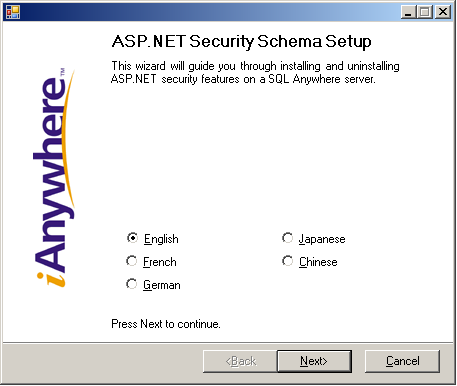
- Select the desired language and click Next.
- Enter "dsn=SQL Anywhere 12 Demo" for the Connection String and click
Next. You can also test the database connection at this
point.
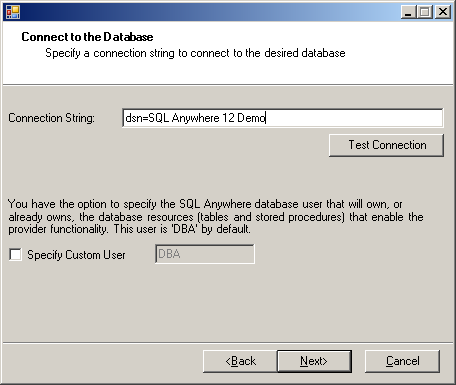
- Add the desired features (all in this case) and click Next.
Notice that you can also remove features already installed.
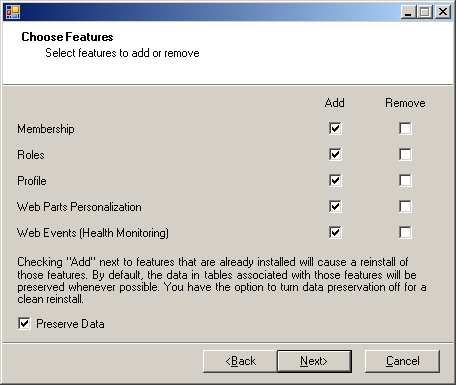
- Verify the installing details and click Finish.
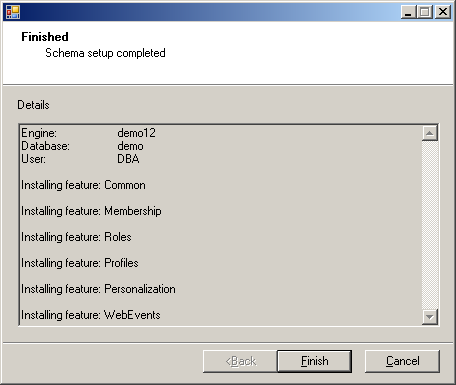
Viewing the SQL Anywhere ASP.NET Providers Schema
The necessary tables and stored procedures are added to the demo database by
the wizard in the previous section, all with the prefix "aspnet_". This section
shows the changes made to provide an overview of how SQL Anywhere stores
confidential login information and application security details.
Steps
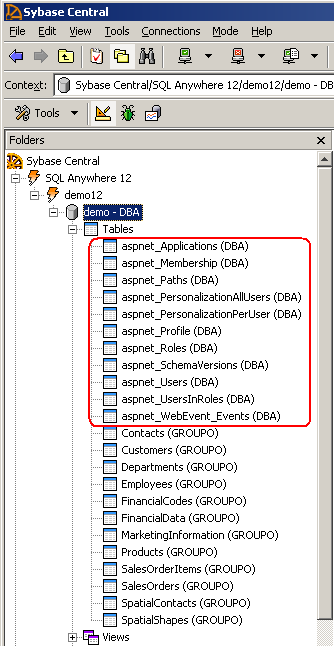
- Open Sybase Central and connect to the demo database. Using the Folders
View, expand Tables to see the tables created by the wizard. As
shown below, notice that new tables prefixed with "aspnet_" are added to the
demo database. These are the tables that hold the security data used in the web
site.
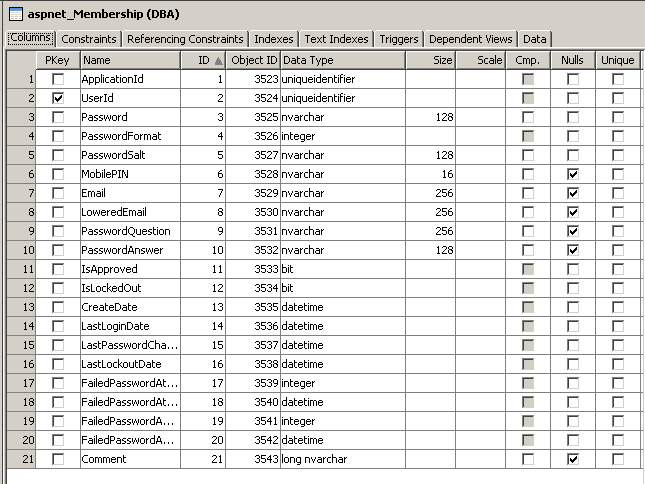
- Click the table aspnet_Membership to view its columns. This
table stores the membership information of the users, including userId (primary
key), password, security question, lastLoginDate and all the necessary
information to perform web site authentication. Password format is hashed by
default, ensuring that the information saved in the database is
secure.
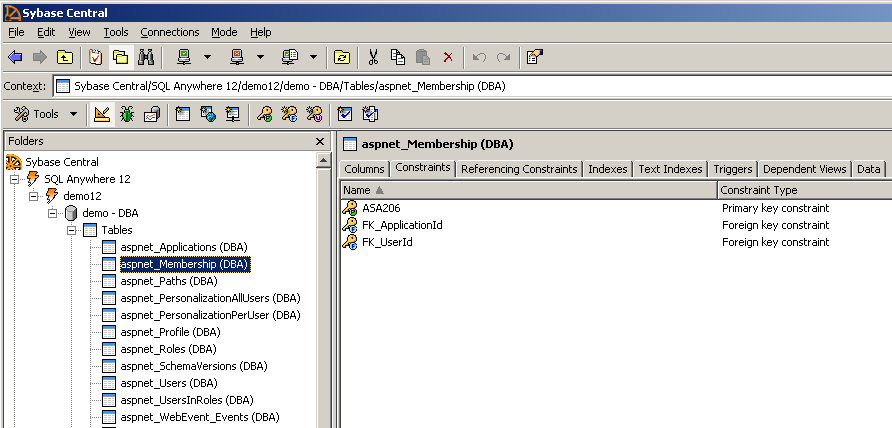
- Click the Constraints tab and notice that the proper key
constraints on the columns are also set up by the wizard.
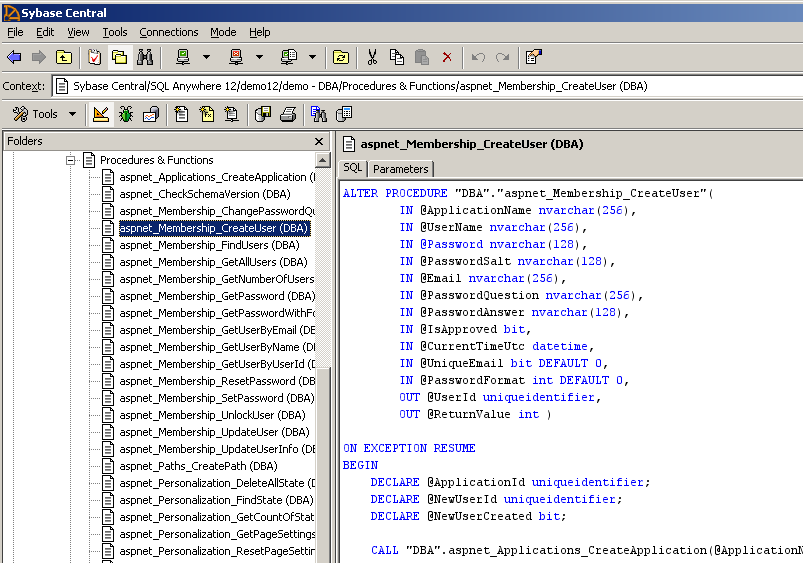
- Expand Procedures and Functions in the folder view. Notice
the wizard added procedures for the operations available in each provider. Click
the aspnet_Membership_CreateUser procedure to view the SQL
code. This is the procedure used by the Membership Provider when a new user
record is inserted into the database.
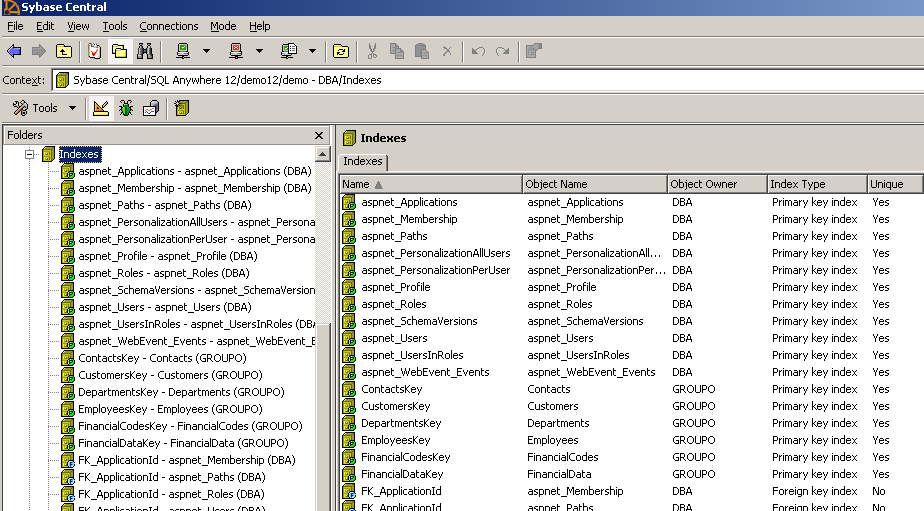
- Expand Indexes and notice that indices are also
automatically created for the added tables to improve performance.
Create an ASP.NET Web Site and Add an Entity Data Model
Any SQL Anywhere database profile defined in Visual Studio can be used to
create a new entity data model (EDM). Follow the steps below to create an
ASP.NET web site and add the SQL Anywhere demo database as an EDM to it.
- Start Visual Studio 2010.
- Select File > New > Web
Site.
- From the 'New Web Site' dialog, choose ASP.NET Web
Site.
- Save the web site as 'Sample_asp.net' in a known location of your choice.
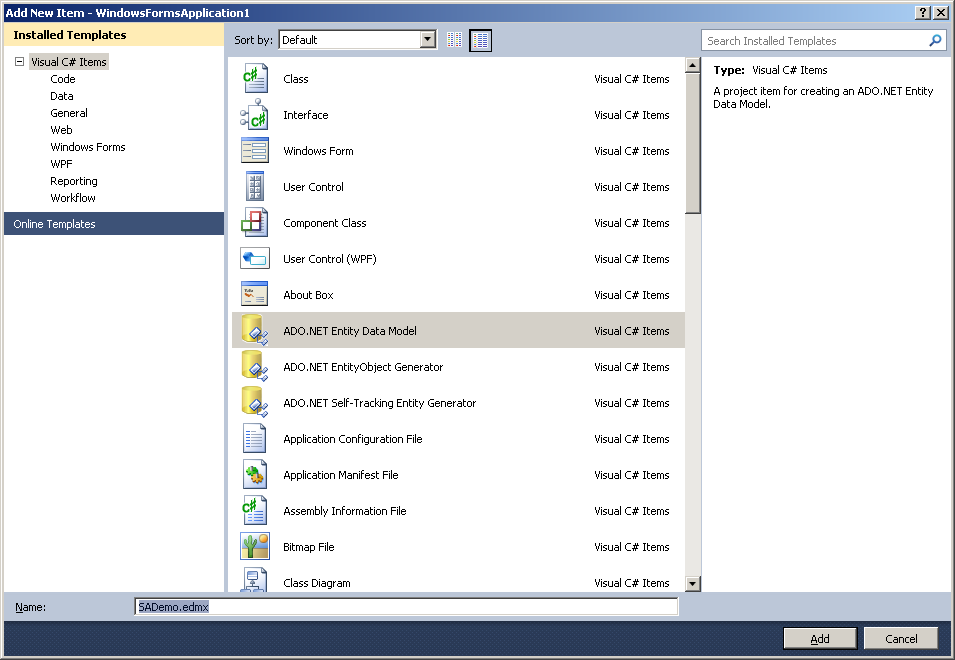
- Right-click the web site project in the Solution Explorer, click Add
New Item > ADO.NET Entity Data Model from the popup
menu.
- In the Name field, type SADemo.edmx. Click
Add.
- Click Yes to add the ADO.NET Entity Model to the folder
App_Code as recommended.
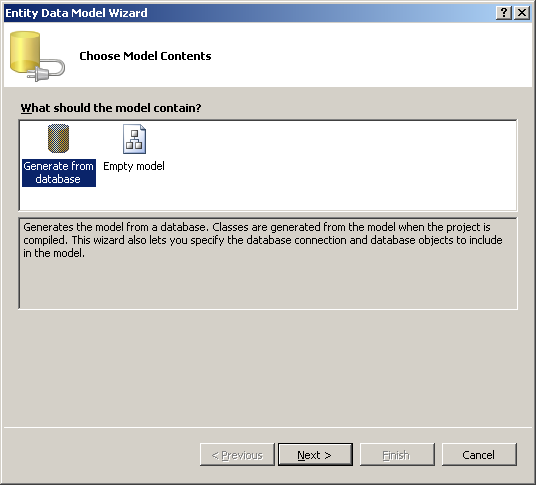
- The Entity Data Model Wizard appears. Select Generate from
database and click Next.
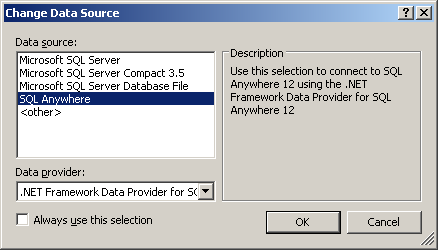
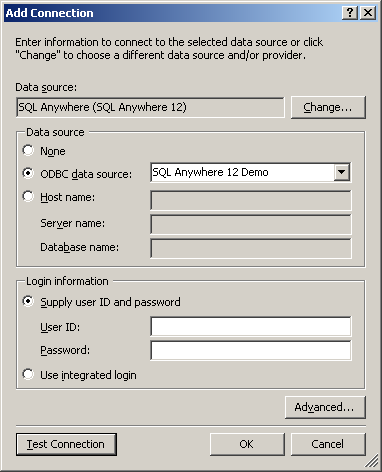
- Click New Connection. Click the Change
button beside Data Source. In the Data source list,
select SQL Anywhere then click OK.
If
SQL Anywhere does not appear in the Data source list, please
ensure that the SQL Anywhere integration components for Visual Studio are
properly installed. To install the integration components:
- Close Visual Studio 2010.
- Open a Command Prompt and change to this directory:
C:\Program
Files\SQL Anywhere 12\Assembly\v2
- Then execute the following command: SetupVSPackage.exe -i
|
- Click ODBC Data Source name and select SQL Anywhere
12 Demo. Click OK.
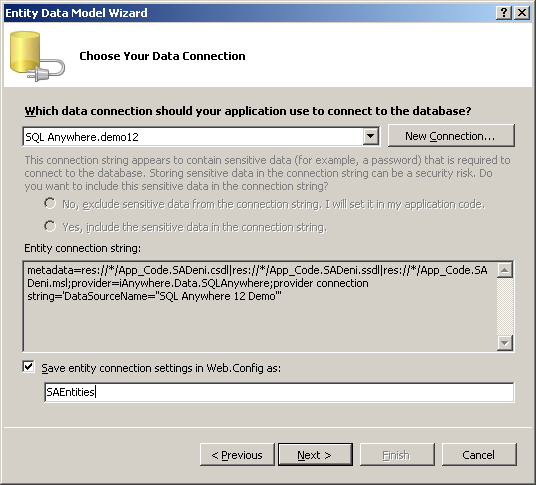
- Change the name of the entity connection string to "SAEntities" and click
Next.
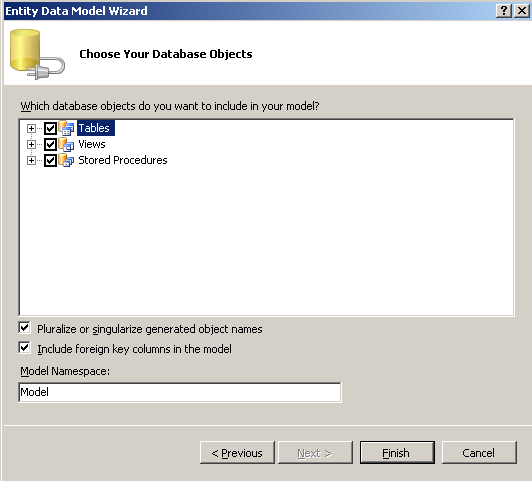
- Include all database objects in the model and click Finish.
In practice, your EDM would only include the objects required by your
application. For simplicity, we're adding all the objects in this tutorial.
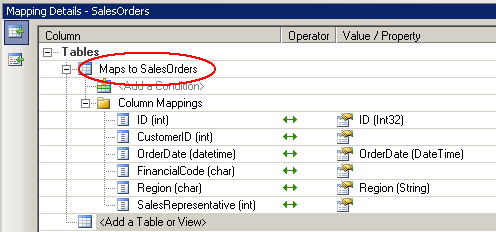
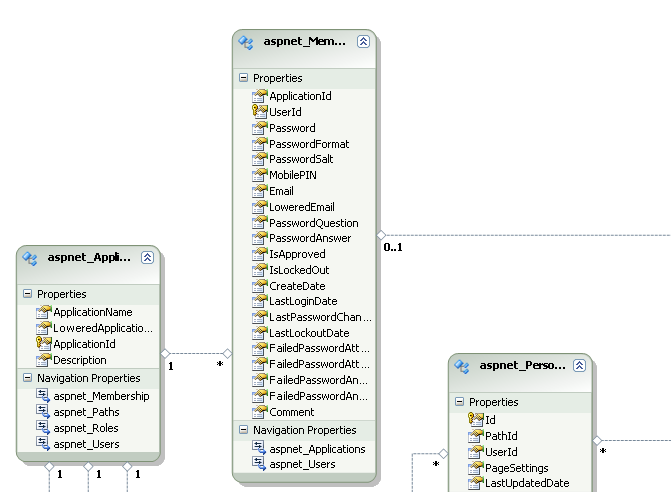
- Open SADemo.edmx file, a visual representation of the model
appears in the Entity Designer. Right-click the SalesOrders entity and select
Table Mapping to view the mapping details. This diagram
illustrates that the entity is properly mapped to the database schema.
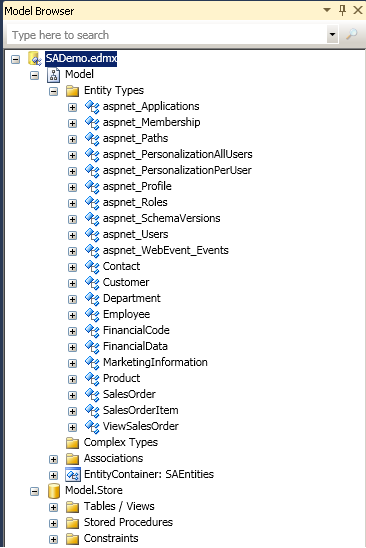
- You can also use the Entity Designer to view the tables that are added to
the demo database by the ASP.NET providers. Right-click the empty space in the
Entity Designer and select Model Browser to obtain an overview
of all the entity types in the Model namespace.
Creating Web Controls to Display Data
Now that we have set up the ASP.NET providers and the Entity Model used in
the web site, we will add a GridView control to the default page and bind it to
an EntityDataSource. This page will be the public area of the web site and all
users are allowed to view the information without any authentication.
Steps
- Open Default.aspx, switch to Design view and drag a
GridView control from the toolbox to replace the default body
content.
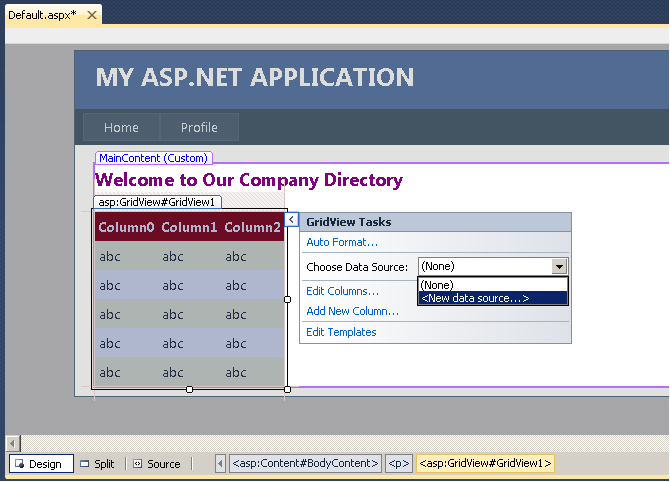
- In the GridView Tasks menu, open the drop down list
Choose Data Source and select <New data
source...>
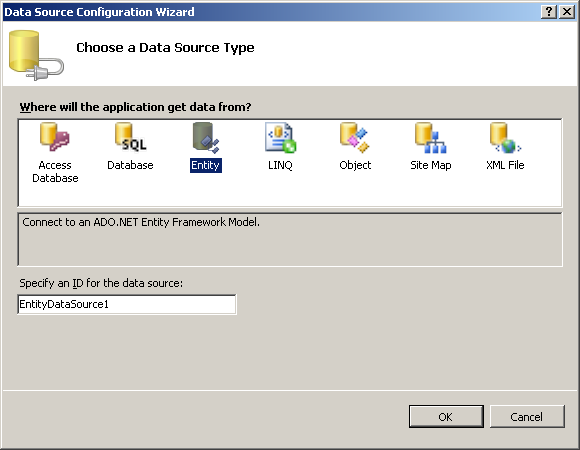
- Choose Entity and click OK.
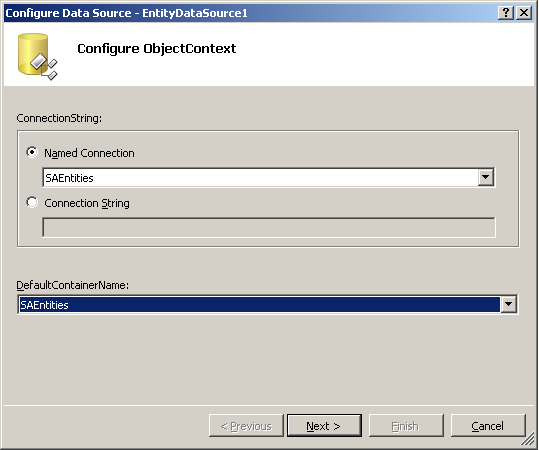
- The Configure Data Source wizard appears. In the Named
Connection drop down list, select SAEntities and click
Next.
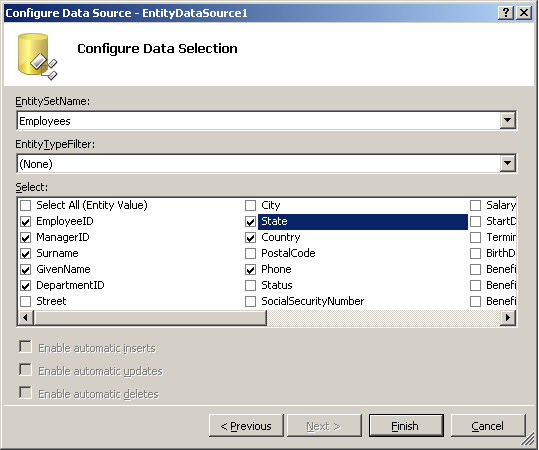
- Select Employees from the EntitySetName drop down list.
Select EmployeeID, ManagerID, Surname, GivenName, DepartmentID, State, Country
and Phone as the public information to be viewed by anyone. Click
Finish.
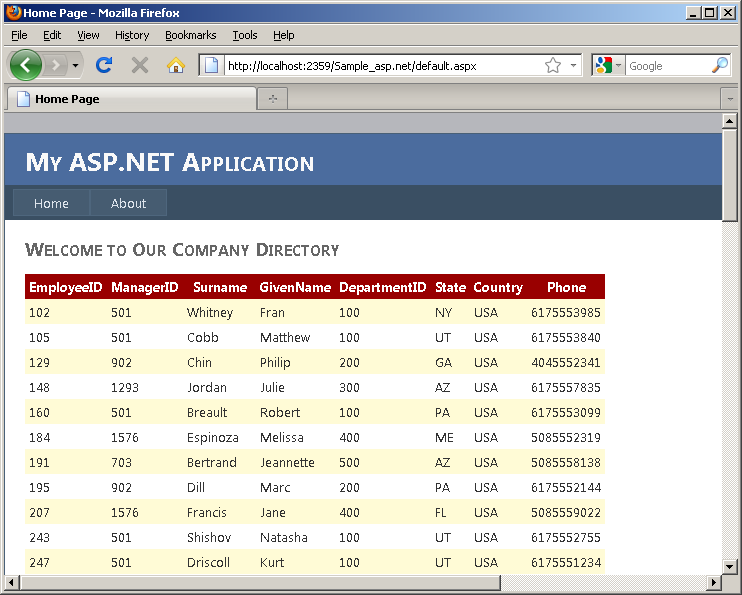
- Hit F5 to run/debug the application. Enable debugging in
the Web.config file if desired (you may see a dialog asking for that). The
default page displays the selected columns from the Employee table in the demo
database. Note that this information is available to anyone who accesses the
page. Close the page and stop the application.
Configuring SQL Anywhere ASP.NET Data Providers
Now we want to add the secure page to the web site and enable the appropriate
security settings. The application also must be configured to use the SQL
Anywhere ASP.NET providers. The following steps show you how to register the SQL
Anywhere ASP.NET providers and how to use the ASP.NET Administration Tool to
manage user information.
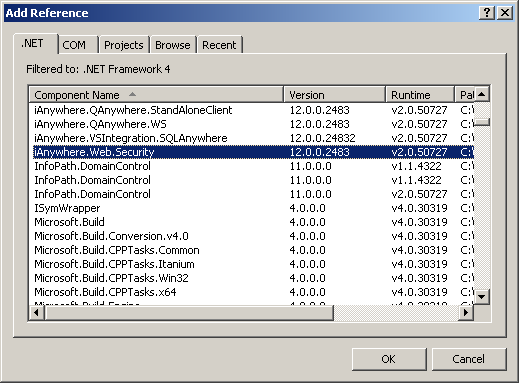
- Right-click the project in the Solution Explorer and select Add
Reference. Select the .NET tab and choose
iAnywhere.Web.Security from the list to add a reference to the
iAnywhere.Web.Security assembly to your web site.
- Open the web.config file and add the connection string to
the <connectionStrings> element (changes are
highlighted):
<connectionStrings>
<!--Register the
connection string-->
<add name="MyConnectionString"
connectionString="dsn=SQL
Anywhere 12 Demo"
providerName="iAnywhere.Data.SQLAnywhere" />
<add name="SAEntities"
connectionString="metadata=res://*/App_Code.SADemo.csdl|res://*/App_Code.SADemo.ssdl|res://*/App_Code.SADemo.msl;provider=iAnywhere.Data.SQLAnywhere;provider
connection string='UserID=dba;Password=sql;DataSourceName="SQL Anywhere
12 Demo"'"
providerName="System.Data.EntityClient" />
</connectionStrings>
- Add an entry for each provider and add <machineKey
validation="SHA1"> to the <system.web>
element. Add the name of the SQL Anywhere ASP.NET provider to
the "defaultProvider" attribute in the application (changes are
highlighted):
<system.web>
<machineKey validation="SHA1"
/>
<compilation debug="true" strict="false"
explicit="true" targetFramework="4.0">
<assemblies>
<add
assembly="System.Security, Version=4.0.0.0, Culture=neutral,
PublicKeyToken=B03F5F7F11D50A3A" />
<add
assembly="System.Data.Entity, Version=4.0.0.0, Culture=neutral,
PublicKeyToken=B77A5C561934E089" />
<add
assembly="System.Data.Entity.Design, Version=4.0.0.0,
Culture=neutral, PublicKeyToken=B77A5C561934E089" />
</assemblies>
<buildProviders>
<add extension=".edmx"
type="System.Data.Entity.Design.AspNet.EntityDesignerBuildProvider"
/>
</buildProviders>
</compilation>
<authentication mode="Forms">
<forms
loginUrl="~/Account/Login.aspx" timeout="2880"
/>
</authentication>
<membership defaultProvider="SAMembershipProvider">
<providers>
<clear />
<add name="SAMembershipProvider" type="iAnywhere.Web.Security.SAMembershipProvider"
connectionStringName="MyConnectionString" enablePasswordRetrieval="false"
enablePasswordReset="true"
requiresQuestionAndAnswer="false"
requiresUniqueEmail="false"
maxInvalidPasswordAttempts="5"
minRequiredPasswordLength="6"
minRequiredNonalphanumericCharacters="0"
passwordAttemptWindow="10"
applicationName="/"
passwordFormat="hashed" />
</providers>
</membership>
<profile defaultProvider="SAProfileProvider">
<providers>
<clear />
<add name="SAProfileProvider"
type="iAnywhere.Web.Security.SAProfileProvider"
connectionStringName="MyConnectionString"
applicationName="/"
commandTimeout="30" />
</providers>
</profile>
<roleManager enabled="true"
defaultProvider="SARoleProvider">
<providers>
<clear
/>
<add
connectionStringName="MyConnectionString"
applicationName="/"
commandTimeout="30"
name="SARoleProvider"
type="iAnywhere.Web.Security.SARoleProvider"
/>
</providers
>
</roleManager
>
</system.web
>
For more information on how to configure the SQL Anywhere ASP.NET Providers,
please refer to the online API documentation.
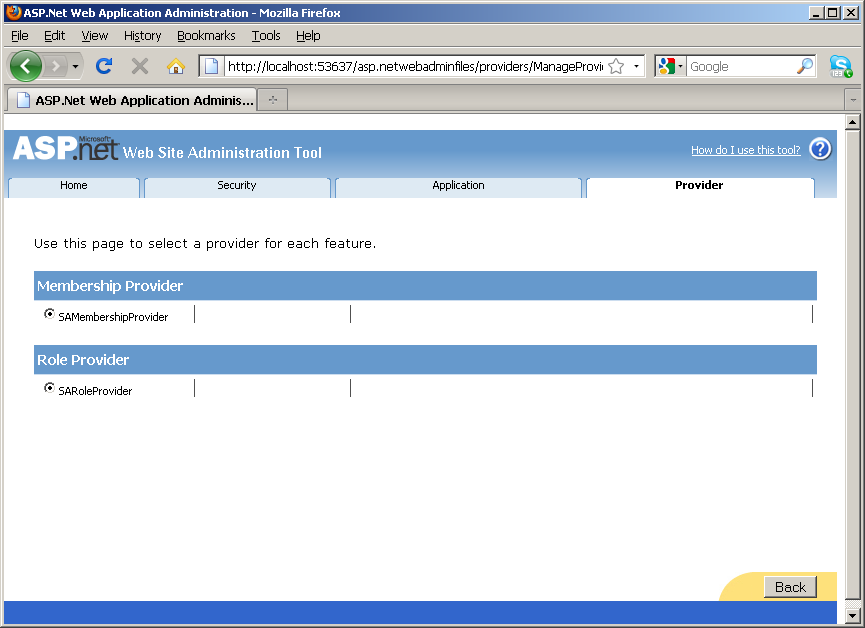
- Now you can use the Web Site Administration Tool to create new users. To use
this tool, save the changes and then click ASP.NET Configuration
on the Website menu in Visual Studio 2010. Click
Provider Configuration > Select a different provider for each feature
(advanced), you'll see that SAMembershipProvider and SARoleProvider are
used.
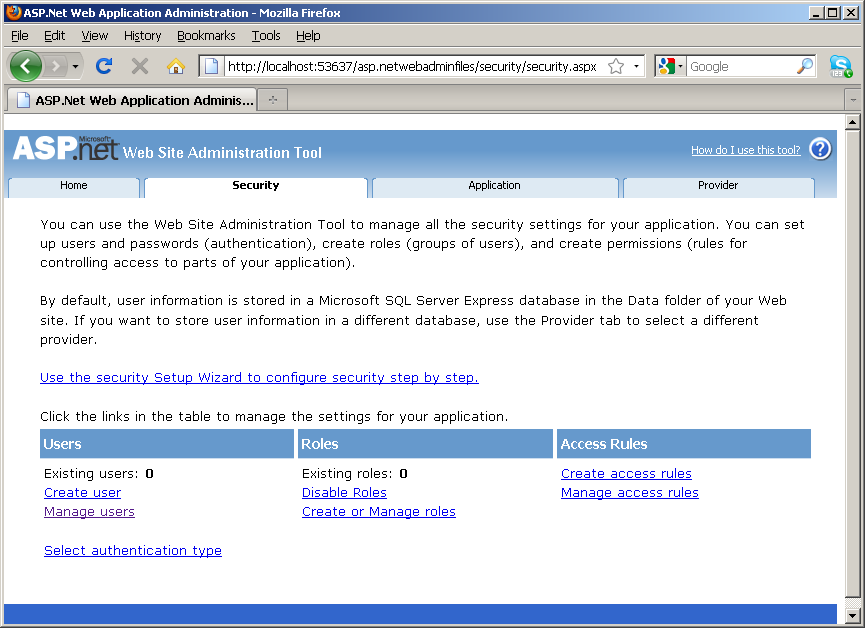
- Under the Security tab, there are a number of tools
provided for you to perform web site administration tasks including enabling
roles and creating access rules for different users.
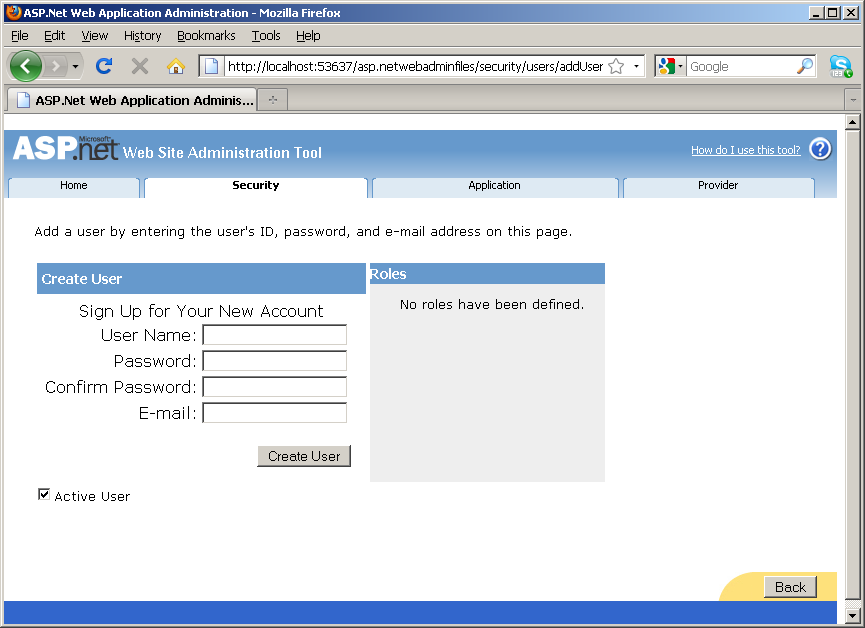
- Click Security>Create user, you will then be able to
create new user accounts by completing the web form.
- Close the ASP.NET Web Application Administration page.
Displaying Private Information for Authenticated Users
Now we can create a second page that displays a detailed employee profile
that's only available to an employee who's logged in. For simplicity, we will
register a user whose information already exists in the Employee table (we'll
use the first name as the user name). We will rename the built-in About.aspx
file and customize it to be an employee profile page that displays private
information. Visual Studio also provides an enhanced ASP.NET web site template
that includes a built-in account folder already configured with basic membership
functionality. We will take advantage of these provided templates to set up the
sample application in the following steps.
- Right-click file About.aspx in solution explore and click
Rename. Rename the file to Profile.aspx.
Notice that the corresponding code file is renamed automatically as well.
- Now we want to edit the menu bar in the master page so that the menu item
name is consistent with the file name. Open the file site.master and switch to
Design view. Locate the navigation menu and click the >
button beside it. Select Edit Menu Items, and Replace the URL
of the second menu item to "~/Profile.aspx" in the Menu Item Editor and change
the Text property to "Profile". Click OK.
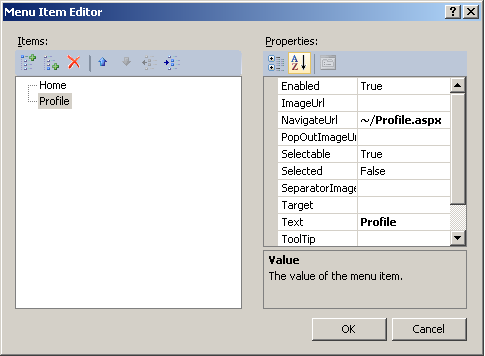
If you switch to
Source view, the markup for the navigation menu should look like this:
<asp:Menu ID="NavigationMenu"
runat="server"
CssClass="menu"
EnableViewState="false"
IncludeStyleBlock="false"
Orientation="Horizontal">
<Items>
<asp:MenuItem NavigateUrl="~/Default.aspx" Text="Home"/>
<asp:MenuItem
NavigateUrl ="~/Profile.aspx" Text="Profile"/>
</Items>
</asp:Menu>
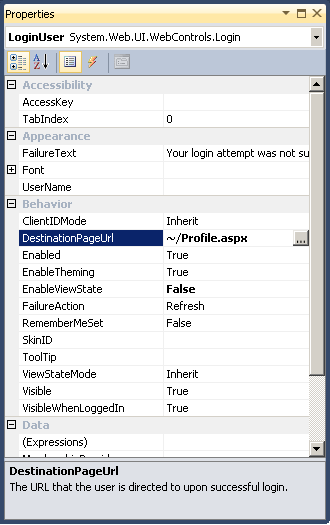
- Now we will edit the default login template so that it automatically
redirects the user to this Profile page after logging in successfully. Open
Account/Login.aspx, right-click the Login control in the Design view and click
Properties. Select Profile.aspx for the DestinationPageURL
property.
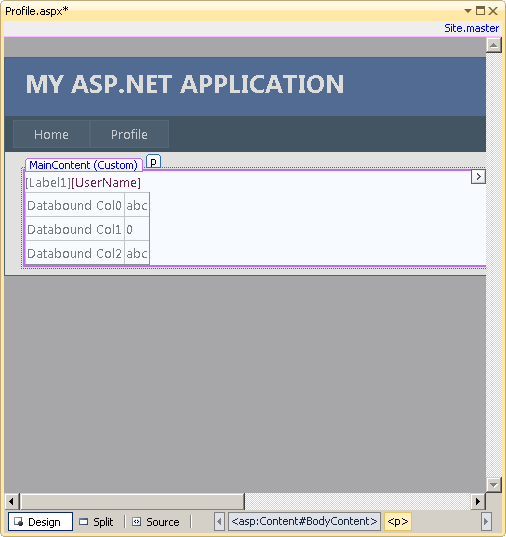
- Open Profile.aspx and delete the default lines in the MainContent place
holder. Then drag a Label control, a LoginName control and a DetailsView control
and drop them into the MainContent place holder.
- In the DetailsView Tasks menu, open the drop down list
Choose Data Source and select <New data
source...>. We'll add a new EntityDataSource as we did for the
public page.
- Choose Entity and click OK.
- From the Named Connection drop down list, select
SAEntities and click Next.
- Select Employees from the EntitySetName drop down list.
This time we will select all the columns in the table. Click
Finish.
- A new EntityDataSource appears below the DetailsView
control. Right-click it and select Properties.
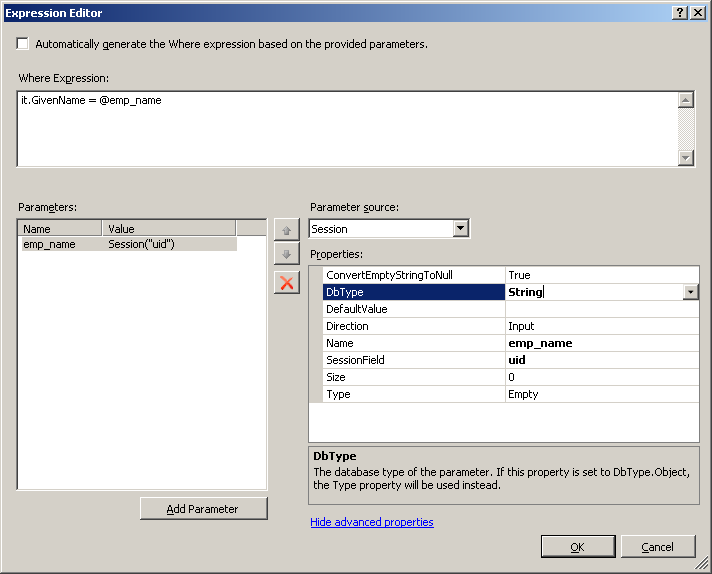
- Click the button beside Where on the Properties menu to
open the Expression Editor. Click Add Parameter and type
"emp_name" in the name field. Select Session
from the Parameter Source drop down list and enter "uid" in the
Session Field. In the Where Expression Field, enter
"it.GivenName=@emp_name".
- Click Show advanced properties and select
String from the DbType drop down list. Click
OK to close the Expression Editor.
- Insert the following code to the Page_Load event of the Profile.aspx page:
[C#]
//check to see if the user has logged
in
if
(User.Identity.IsAuthenticated)
{
//retrieve the user name and save it as a session variable
var user = User.Identity;
Session["uid"] = user.Name;
//display login information
Label1.Text =
"You are logged in as ";
}
else {
Session["uid"] = "";
Label1.Text = "Hello Guest! Please sign in to view your
profile.";
}
[VB]
‘check to see if the user has logged
in
If
User.Identity.IsAuthenticated Then
‘retrieve the user name and save it as a session
variable
Dim user As MembershipUser = Membership.GetUser()
Session("uid") = user.UserName.ToString
Label1.Text
= "You are logged in as "
Else
Session("uid") = ""
Label1.Text = "Hello Guest! Please sign in to view your
profile."
End If
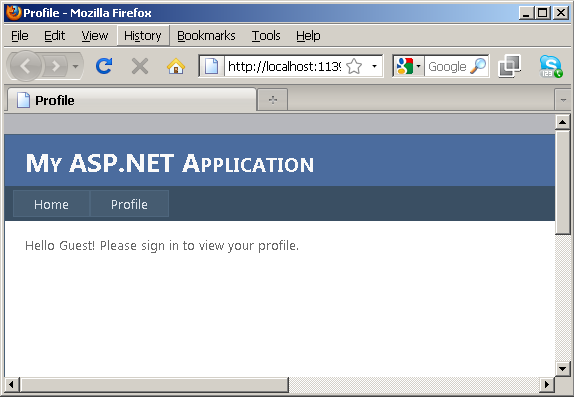
- Now press F5 to view the page. Notice that the label
displays a message to indicate that the user has not signed in.
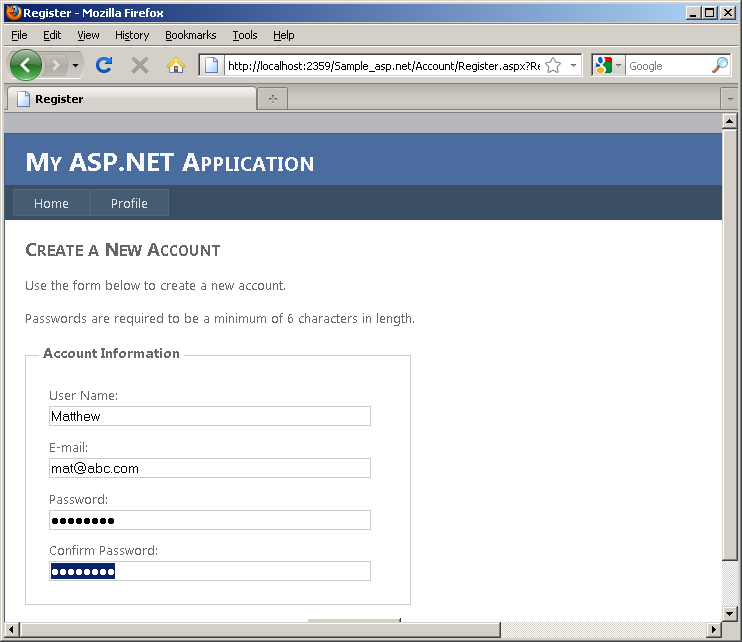
- Click Log in at the upper right corner of the page. Click Register and enter
the user name "Matthew" (a record for this employee already exists in the demo
database). Set the password to "password". Click Create User.
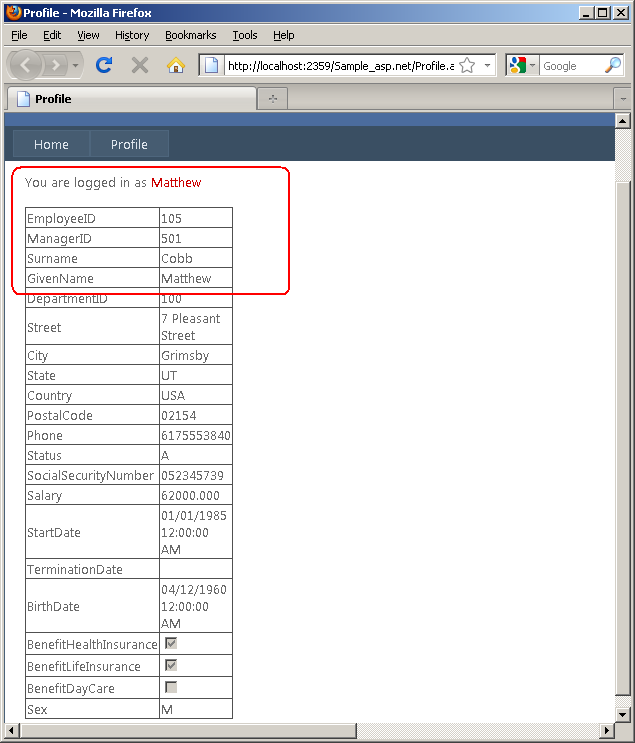
- Notice that the Home page displays the public information, while the
DetailsView control in the Profile page displays the private data for the user
Matthew using all the columns from the Employee table.
- Now click Log out and try to access the page again. Notice
that the information is no longer available since the user is not authenticated.
- Close the web browser.
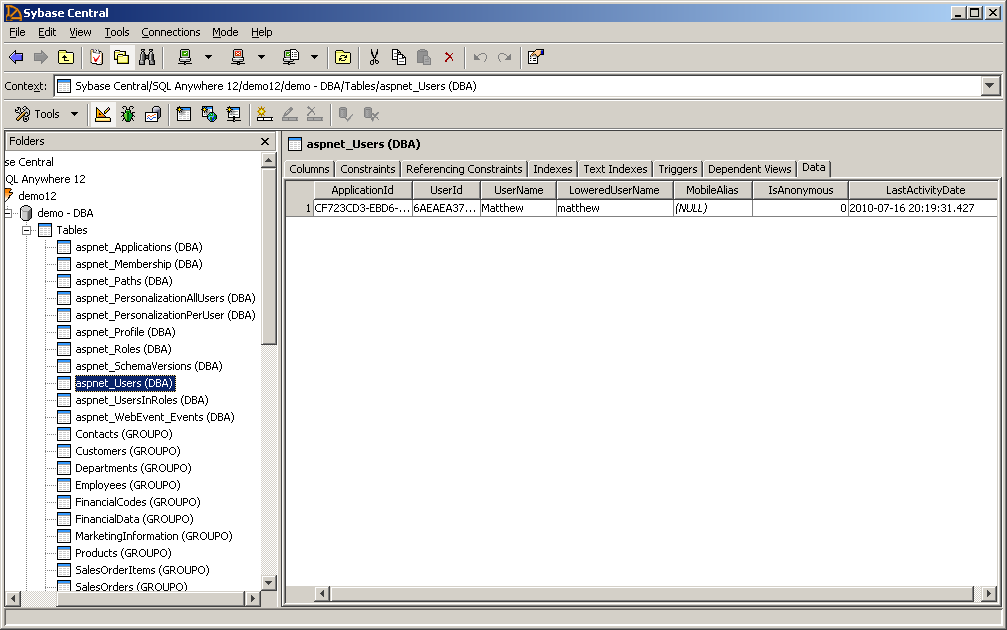
- Back in Sybase Central, expand Tables and select the table
aspnet_users to view its data. Notice that there's a new row
created for the user "Matthew" with his authentication information stored.
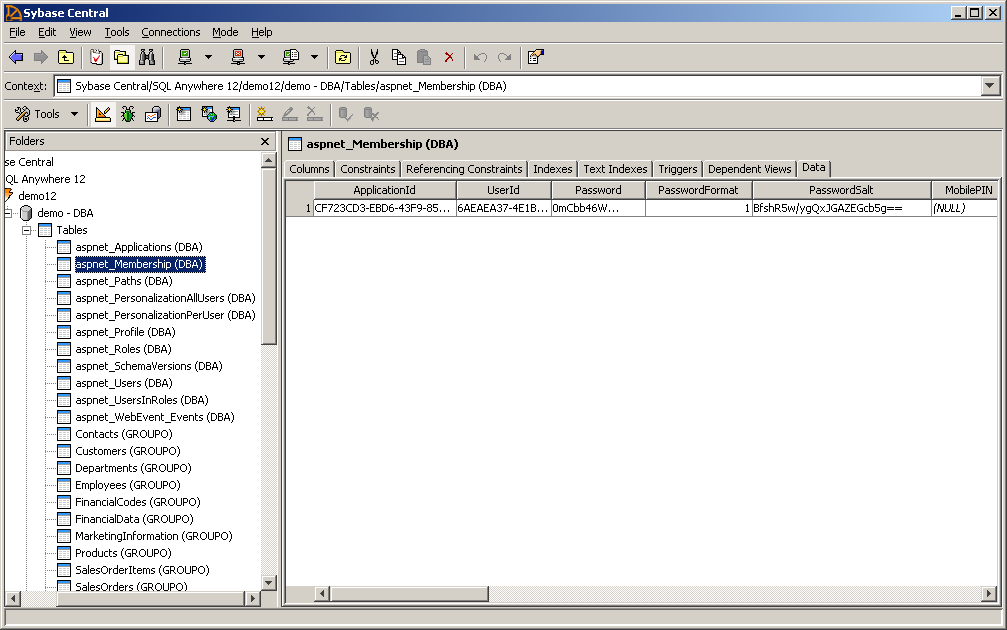
- Select the table aspnet_Membership and click the
Data tab. Notice that a new row is added to store the
membership information of Matthew. When you use the other ASP.NET providers such
as the Profile provider, you can check and manage the data stored in the
corresponding table using Sybase Central as well.
Enabling Dynamic Data
- Run the simple web site, and log in as user Matthew, notice that the date
format in the StartDate and BirthDate columns
don't show up in a desired format. The time 12:00:00AM is automatically
generated since there is no time information in the database. We want to modify
the Employee class to display these two dates in a standard YYYY-MM-DD
format.
In addition, notice that the TerminationData field
is empty, meaning that there is no record in the database. We will also set a
default value to be displayed when the data is null. Close the web application.
- Back in Visual Studio, add a new classfile to the folder App_Code and name
the new file Employee.cs or
Employee.vb.
- Insert the following lines of code to the added file:
[C#]
using
System.Web.DynamicData;
using
System.ComponentModel.DataAnnotations;
namespace Model {
//Extend the Employee partial
class
[MetadataType(typeof(EmployeeMeta))]
public partial class Employee {
public class EmployeeMeta
{
//re-format the StartDate
column
[DisplayFormat(DataFormatString="{0:yyyy-MM-dd}")]
public object StartDate { get; set;
}
[DisplayFormat(DataFormatString="{0:yyyy-MM-dd}")]
public object BirthDate { get; set;
}
//sets default value for the
TerminationDate column
[DisplayFormat(NullDisplayText="N/A")]
public object TerminationDate { get; set;
}
}
}
}
[VB]
Imports Microsoft.VisualBasic
Imports
System.ComponentModel.DataAnnotations
Imports System.Web.DynamicData
Namespace Model
<MetadataType(GetType(EmployeeMeta))> _
Partial Public Class Employee
End
Class
Public Class EmployeeMeta
<DisplayFormat(DataFormatString:="{0:yyyy-MM-dd}")> _
Public Property StartDate() As Object
Get
End Get
Set(ByVal value As Object)
End Set
End Property
<DisplayFormat(DataFormatString:="{0:yyyy-MM-dd}")> _
Public Property BirthDate() As Object
Get
End Get
Set(ByVal value As Object)
End Set
End Property
<DisplayFormat(nulldisplaytext:="N/A")> _
Public Property TerminationDate() As Object
Get
End
Get
Set(ByVal value
As Object)
End Set
End Property
End Class
End
Namespace
- Open Profile.aspx and switch to Source view. Replace the markup for the
GridView control and the EntityDataSource object with the following lines:
<asp:DetailsView ID="DetailsView1"
runat="server" Height="50px"
Width="125px" DataSourceID="EntityDataSource1" AutoGenerateRows="true">
</asp:DetailsView>
<asp:EntityDataSource ID="EntityDataSource1" runat="server"
ConnectionString="name=SAEntities" EnableFlattening="False"
EntitySetName="Employees" Where="it.GivenName =
@emp_name" ContextTypeName="Model.SAEntities" EntityTypeFilter="" Select="">
<WhereParameters>
<asp:SessionParameter DefaultValue=""
Name="emp_name" SessionField="uid"
DbType="String"
/>
</WhereParameters>
</asp:EntityDataSource> This deletes the
bound fields for the DetailsView control and lets Dynamic Data format the data.
- Add the following line to the Page_Load event of the Profile.aspx
page:
[C#]
DetailsView1.EnableDynamicData( typeof(Model.Employee));
[VB]
DetailsView1.EnableDynamicData( GetType(Model.Employee))
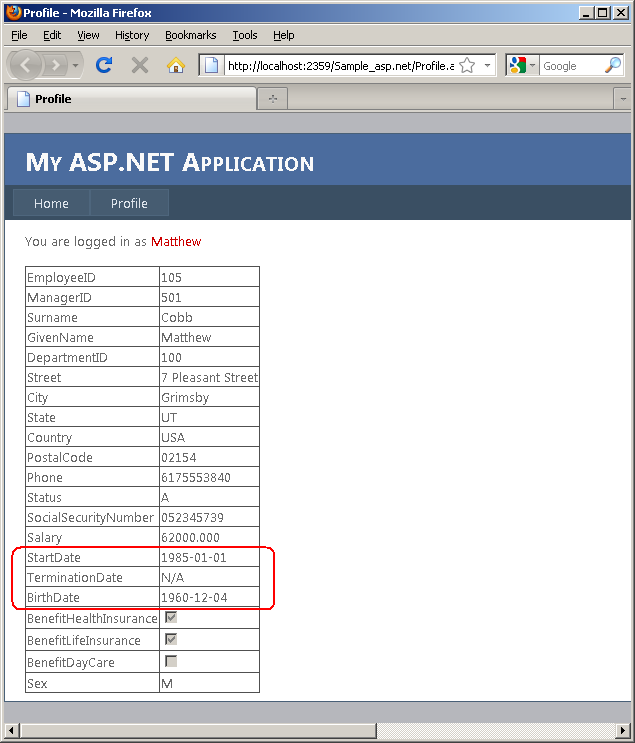
- Now run the web site again and log in as user Matthew. Notice changes in the
display format of the StartDate, BirthData and TerminationDate fields are made
according to the annotation in the Employee code file.
- Close the web browser. This concludes the tutorial.
Removing the SQL Anywhere ASP.NET Providers
If you want to revert the demo database to its original state, you must
un-install the SQL Anywhere ASP.NET providers.
- Start the ASP.NET Security Schema Setup Wizard mentioned in the installation
section and connect to the demo database.
- Select all the features for removal and un-check Preserve
Data at the third step, then complete the wizard.
- The wizard will remove the SQL Anywhere ASP.NET providers tables from the
demo database.
Summary
By taking advantage of the SQL Anywhere ASP.NET providers and the enhanced
web site template provided by ASP.NET 4.0, developers can build a
security-enabled web site with very little effort. The SQL Anywhere integration
components for Visual Studio 2010 and its Entity Model support further enables
developers to implement data-driven web applications by binding
EntityDataSources to data-bound server controls. Using the new Dynamic Data
feature of .NET 4.0, developers can easily implement business logic simply by
extending a partial class instead of struggling with markup or SQL queries.
|

